什么是JTAG?
JTAG is an IEEE standard (1149.1) developed in the 1980s to solve electronic boards manufacturing issues. Nowadays it finds more use as programming, debug and probing port.
But first, let's see JTAG's original use, boundary testing.
边界测试
Here's a simple electronic board (also called “PCB” for “printed circuit board”) with two ICs (“integrated circuits”), a CPU and an FPGA. A typical board may have many more ICs.

ICs can have lots of pins. So of course, ICs are connected together with lots of connections (PCB traces).
We show just four here. But you can easily have a few thousands on a PCB.

Now if you build a thousand boards, each with a few a thousand connections, you inevitably have a few bad boards. How do you test all these boards? You have to make sure that all these connections are fine. You can't just test all these connections by hand. So JTAG was created.
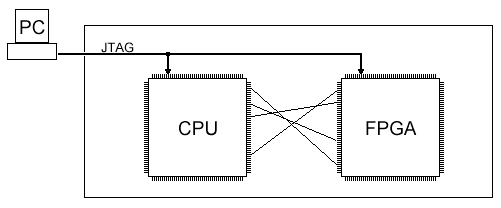
JTAG can take control (or hijack) the pins of all the ICs. On the picture, maybe JTAG is going to make all the CPU pins outputs, and all the FPGA pins inputs. Then by sending some data from the CPU pins, and reading the values from the FPGA pins, JTAG can make sure that the board connections are fine. It is called an “IC boundary test”.
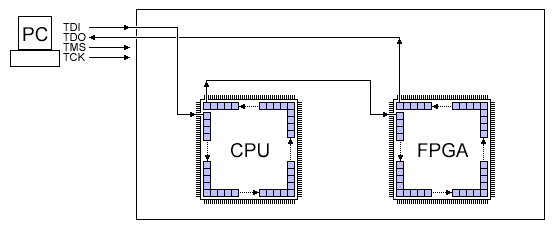
Now JTAG really consists of four logic signal, named TDI, TDO, TMS and TCK. From the PC's point of view, that's three outputs, and one input.
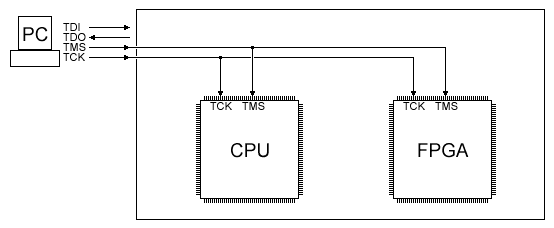
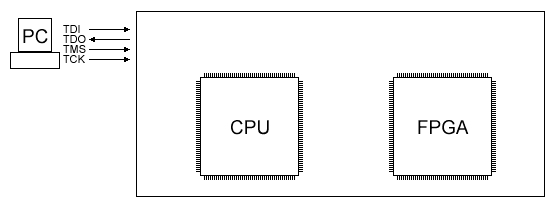 These four signals need to be wired in a particular way. First TMS and TCK are wired in parallel to all JTAG ICs.
Then TDI and TDO and connected to form a chain. In JTAG terminology, you often hear the term “JTAG-chain”, that's where it comes from.
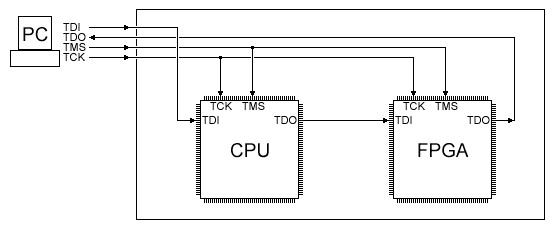
As you can see, each JTAG compliant IC has four pins used for JTAG (three inputs, and one output). A fifth pin named TRST is optional (JTAG reset). The JTAG pins are usually dedicated (not shared for other purposes).
All big ICs use boundary testing using JTAG - boundary testing is the original reason JTAG was created.
But wouldn't it be nice to use JTAG for more purposes than just boundary testing?
- CPU and FPGA manufacturers allow JTAG to be used as debug port.
- FPGA manufacturers also allow configuring the FPGA through JTAG, and use the JTAG signals inside the FPGA core.
JTAG的工作原理
Now that we know how to connect JTAG to different ICs, let's see in details how JTAG works and how to control it from a PC.
Control JTAG from your PC
You use a “JTAG cable” to control a JTAG bus from a PC. The JTAG cable is just a way to control the four JTAG signals from the PC.
The JTAG cable might connect to a PC's
- Parallel (printer) port
- USB port
- Ethernet port
The simplest is a parallel port JTAG cable. USB and Ethernet JTAG cables are good too. They are faster at streaming large amount of data, but more complex to control and with more overhead (=slower) for small amount of data.
The parallel port
A parallel port can be regarded as a twelve bits output from the PC, and a five bits input to the PC. JTAG just requires a three bits output and a one bit input, so that's no problem. For example, take a look at the schematic of Xilinx's parallel-III cable. You can see on the left the PC's parallel signals, one the right the JTAG connector, and in the middle a few 74HC125 electronic buffers.
From the software point of view, a parallel port is ideal since it is very easy to control. For example, here's C code that shows how to toggle the TCK signal for an Altera ByteBlaster JTAG cable.
#define lpt_addr 0x378
#define TCK 0x01

void toggle_TCK()
{
	outport(lpt_addr, 0);
	outport(lpt_addr, TCK);
	outport(lpt_addr, 0);
}
One minor problem with Windows 2000/XP/Vista is that the “outport” IO instruction is restricted, but GiveIO and UserPort are free generic drivers that open up the IO space.
The JTAG TAP controller
We know that a PC is connected to the JTAG bus as illustrated here:

So we have 4 signals (TDI, TDO, TMS, TCK) to take care of.
TCK
TCK is the JTAG clock signal. The other JTAG signals (TDI, TDO, TMS) are synchronous to TCK. So TCK has to toggle for anything to happen (usually things happen on TCK's rising edge).
TMS
Inside each JTAG IC, there is a JTAG TAP controller. On the figure above, that means that there is a TAP controller in the CPU and another in the FPGA.
The TAP controller is mainly a state machine with 16 states. TMS is the signal that controls the TAP controller. Since TMS is connected to all the JTAG ICs in parallel, all the TAP controllers move together (to the same state).
Here's the TAP controller state machine:
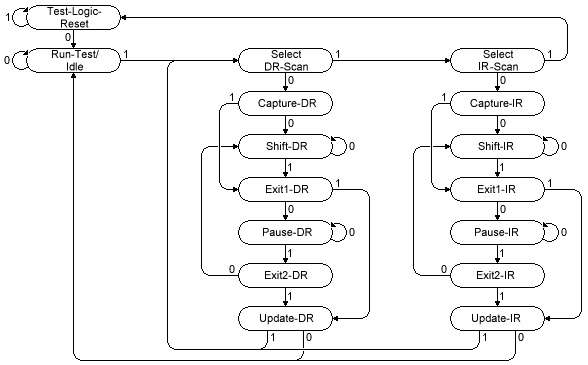
The little numbers (“0” or “1”) close to each arrow are the value of TMS to change state. So for example, if a TAP controller is at state “Select DR-Scan” and TMS is “0” and TCK toggles, the state changes to “Capture-DR”.
For JTAG to work properly, the tap controllers of a JTAG chain must always be in the same state. After power-up, they may not be in sync, but there is a trick. Look at the state machine and notice that no matter what state you are, if TMS stays at “1” for five clocks, a TAP controller goes back to the state “Test-Logic-Reset”. That's used to synchronize the TAP controllers.
So let's say we want to go to “Shift-IR” after power-up:
	// first sync everybody to the test-logic-reset state
	for(i=0; i<5; i++) JTAG_clock(TMS);

	// now that everybody is in a known and identical state, we can move together to another state
	// let's go to Shift-IR
	JTAG_clock(0);
	JTAG_clock(TMS);
	JTAG_clock(TMS);
	JTAG_clock(0);
	JTAG_clock(0);
TDI and TDO
Now that we know how to change state, we can use the two most important JTAG states, namely “Shift-DR” and “Shift-IR”.

Shift-DR and Shift-IR are used in combination with the TDI and TDO lines. Let's start with Shift-IR.
There is one register into each IC TAP controller called IR, the “instruction register”. You write a value into this register that corresponds to what you want to do with JTAG (each IC has a list of possible instructions).
Also each IC IR register has a specific length. For example, let's say that the CPU's IR is 5 bits long, and the FPGA's IR is 10 bits long. The IR registers form a chain that is loaded through the TDI and TDO pins.

From the PC point of view, the above IR chain is 15 bits long. To load IR values, the PC has to make sure the TAP controllers are in the Shift-IR state, and send 15 bits through TDI. Once shifted, the first 10 bits actually end up into the FPGA IR, and the last 5 bits into the CPU IR. If the PC was sending more than 15 bits, it would start receiving back what it sent (with a delay of 15 clocks) on TDO.
For example, let's send 00100 into the CPU's IR, and 0000000010 into the FPGA's IR.
	// Because the bits are shifted through in a chain, we must start sending the data for the device that is at the end of the chain
	// so we send the 10 FPGA IR bits first
	JTAG_clock(0);
	JTAG_clock(1);
	JTAG_clock(0);
	JTAG_clock(0);
	JTAG_clock(0);
	JTAG_clock(0);
	JTAG_clock(0);
	JTAG_clock(0);
	JTAG_clock(0);
	JTAG_clock(0);

	// then send the 5 CPU IR bits
	JTAG_clock(0);
	JTAG_clock(0);
	JTAG_clock(1);
	JTAG_clock(0);
	JTAG_clock(0 | TMS);	// last bit needs to have TMS active (to exit shift-IR)
In our example, the CPU's IR is 5 bits long (i.e. can hold values from 0 to 31). That means it can support up to 32 JTAG instructions. In practice, a CPU probably uses 5 to 10 instructions, and the remaining IR values are unused.
Same thing for the FPGA, with a 10 bits long IR, it can hold 1024 instructions, with most of them unused.
JTAG has a few mandatory instructions (what these instructions do will be illustrated later):
- BYPASS
- EXTEST
- SAMPLE/PRELOAD
- IDCODE (not mandatory but very often implemented) To get the list of possible IR values supported by a specific IC, check the IC's datasheet (or BSDL file - more on that later).
DR registers
Each TAP controller has only one IR register, but has multiple DR registers. The DR registers are similar to the IR registers (they are shifted the same way the IR registers are but using the Shift-DR state instead of the Shift-IR).
Each IR value selects a different DR register. So in our example, the CPU could have up to 32 DR registers (if all IR instructions were implemented).
Query the JTAG chain
Count the number of devices in the JTAG chain
One important IR value is the “all-ones” value. For the CPU that would be 11111 and for the FPGA, that's 1111111111. This value corresponds to the mandatory IR instruction called BYPASS. In bypass mode, the TAP controller DR register is always a single flip-flop which does nothing besides delaying the TDI input by one clock cycle before outputting to TDO.
One interesting way to use this BYPASS mode is to count the number of ICs that are present in the JTAG chain. If each JTAG IC delays the TDI-TDO chain by one clock, we can send some data and check by how long it is delayed. That gives us the number of ICs in the chain.
Here's an example:
  // go to reset state
  for(i=0; i<5; i++) JTAG_clock(TMS);

  // go to Shift-IR
  JTAG_clock(0);
  JTAG_clock(TMS);
  JTAG_clock(TMS);
  JTAG_clock(0);
  JTAG_clock(0);

  // Send plenty of ones into the IR registers
  // That makes sure all devices are in BYPASS!
  for(i=0; i<999; i++) JTAG_clock(1);
  JTAG_clock(1 | TMS);  // last bit needs to have TMS active, to exit shift-IR

  // we are in Exit1-IR, go to Shift-DR
  JTAG_clock(TMS);
  JTAG_clock(TMS);
  JTAG_clock(0);
  JTAG_clock(0);

  // Send plenty of zeros into the DR registers to flush them
  for(i=0; i<1000; i++) JTAG_clock(0);

  // now send ones until we receive one back
  for(i=0; i<1000; i++) if(JTAG_clock(1)) break;

  nbDevices = i;
  printf("There are %d device(s) in the JTAG chain\n", nbDevices);
Get the IDs of the devices in the JTAG chain
Most JTAG ICs support the IDCODE instruction. In IDCODE mode, the DR register is loaded with a 32-bits value that represents the device ID.
Unlike for the BYPASS instruction, the IR value for the IDCODE is not standard. Fortunately, each time the TAP controller goes into Test-Logic-Reset, it goes into IDCODE mode (and loads the IDCODE into DR).
Here's an example:
  // go to reset state (that loads IDCODE into IR of all the devices)
  for(i=0; i<5; i++) JTAG_clock(TMS);

  // go to Shift-DR
  JTAG_clock(0);
  JTAG_clock(TMS);
  JTAG_clock(0);
  JTAG_clock(0);

  // and read the IDCODES
  for(i=0; i < nbDevices; i++)
  {
    printf("IDCODE for device %d is %08X\n", i+1, JTAG_read(32));
  }
Run a boundary-scan
Now let's ask the TAP controllers to go into boundary-scan mode, where the DR chain goes through each IO block and can read or hijack each pin!
Boundary-scan can be used even while a device is otherwise running. So for example, using JTAG on an FPGA, you can tell the status of each pin while the FPGA is running.
SAMPLE
Let's try to read the value of the pins. We use a JTAG instruction called SAMPLE for that. Each IC instruction code list is different. You have to look into the IC datasheet, or the IC BSDL file to get the codes.
A BSDL file is actually a VHDL file that describes the boundary chain of an IC. Here's an interesting portion of an Altera BSDL file (Cyclone EP1C3 in TQFP 100 pins package).
attribute INSTRUCTION_LENGTH of EP1C3T100 : entity is 10;

attribute INSTRUCTION_OPCODE of EP1C3T100 : entity is
  "BYPASS            (1111111111), "&
  "EXTEST            (0000000000), "&
  "SAMPLE            (0000000101), "&
  "IDCODE            (0000000110), "&
  "USERCODE          (0000000111), "&
  "CLAMP             (0000001010), "&
  "HIGHZ             (0000001011), "&
  "CONFIG_IO            (0000001101)";

attribute INSTRUCTION_CAPTURE of EP1C3T100 : entity is "0101010101";

attribute IDCODE_REGISTER of EP1C3T100 : entity is
  "0000"&               --4-bit Version
  "0010000010000001"&   --16-bit Part Number (hex 2081)
  "00001101110"&        --11-bit Manufacturer's Identity
  "1";                  --Mandatory LSB

attribute BOUNDARY_LENGTH of EP1C3T100 : entity is 339;
Here's what we learn from this device's BSDL:
- The length of the IR register (10 bits long).
- The list of possible IR instructions, with their 10 bits codes. The code for SAMPLE is 0000000101b = 0x005.
- The IDCODE of the part (the manufacturer code reads 00001101110b = 0x6E, which is Altera. Xilinx would have been 00001001001b = 0x49).
- The length of the boundary-scan chain (339 bits long).
- The boundary-scan is 339 bits long. That doesn't mean there are 339 pins.
Each pin use an IO pad on the IC die. Some IO pads use one, two or three bits from the chain (depending if the pin is input only, output with tri-state, or both). See the links at the bottom of this page for more details. Also some registers correspond to IO pads that may not be bounded (they exists on the IC die but are not accessible externally). Which explains why a 100 pins device can have a 339 bits boundary-scan chain.
Going back to the BSDL file, we also get this:
attribute BOUNDARY_REGISTER of EP1C3T100 : entity is
  --BSC group 0 for I/O pin 100
  "0   (BC_1, IO100, input, X)," &
  "1   (BC_1, *, control, 1)," &
  "2   (BC_1, IO100, output3, X, 1, 1, Z)," &

  --BSC group 1 for I/O pin 99
  "3   (BC_1, IO99, input, X)," &
  "4   (BC_1, *, control, 1)," &
  "5   (BC_1, IO99, output3, X, 4, 1, Z)," &

  ...
  ...
  ...

  --BSC group 112 for I/O pin 1
  "336 (BC_1, IO1, input, X)," &
  "337 (BC_1, *, control, 1)," &
  "338 (BC_1, IO1, output3, X, 337, 1, Z)" ;
This lists all the 339 bits of the chain, and what they do. For example, bit 3 is the one that tells us what is the value on pin 99.
Let's read the boundary-scan registers, and print the value on pin 99:
  // go to reset state
  for(i=0; i<5; i++) JTAG_clock(TMS);

  // go to Shift-IR
  JTAG_clock(0);
  JTAG_clock(TMS);
  JTAG_clock(TMS);
  JTAG_clock(0);
  JTAG_clock(0);

  // Assuming that IR is 10 bits long,
  // that there is only one device in the chain,
  // and that SAMPLE code = 0000000101b
  JTAG_clock(1);
  JTAG_clock(0);
  JTAG_clock(1);
  JTAG_clock(0);
  JTAG_clock(0);
  JTAG_clock(0);
  JTAG_clock(0);
  JTAG_clock(0);
  JTAG_clock(0);
  JTAG_clock(0 or TMS);  // last bit needs to have TMS active, to exit shift-IR

  // we are in Exit1-IR, go to Shift-DR
  JTAG_clock(TMS);
  JTAG_clock(TMS);
  JTAG_clock(0);
  JTAG_clock(0);

  // read the boundary-scan chain bits in an array called BSB
  JTAG_read(BSB, 339);
  printf("Status of pin 99 = %d\n, BSB[3]);
Easy, right?
Do more with JTAG
- JTAG can hijack the pins. The JTAG instruction for that is EXTEST (“external test”).
- JTAG can perform FPGA configuration. See for example this file.
- JTAG can be used as debug port - for example Altera's SignalTap and Xilinx's ChipScope.
Your turn to experiment!
Links
- Altera器件的Boundary-Scan Testing
- Xilinx的BSDL文件.
- Altera的BSDL文件.
更详细的信息参见:WiKiPedia上关于JTAG的定义
